Daily Archives: April 23, 2014

Illustrator Edits + Sketches

So what I have decided to do is use illustrator to trace the image of the snake that I want to use in my WWF design’s, I began by using the basic black and white edit that I done of the image.

My goal is to create a line drawing of the snake and also edit it in adobe illustrator using fill techniques and other processes.

image


Picture 13

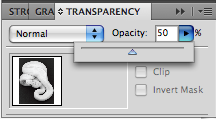
Started out by first creating several layers, 1 for the image itself which I turned down the transparency to 50% to allow the image to be traced easier.

Picture 14


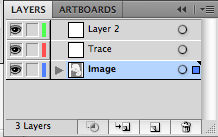
Another layer for the tracing itself and another for anything else.

Picture 15


Picture 16

Very basic Line drawing using the pen tool in illustrator, it was very easy to do this because a lot of the lines where very smooth and straight.

Picture 17

Picture 18

Using what I have done in the past in my Unusual words project I began to just experiment at different illustrative options for my snake trace, I would still prefer to do an actual sketch but this is working out okay, I will have to see what I can come up with in the next week and make a choice.

Picture 19


Mid editing, waiting for the computer to catch is is very time consuming sometimes taking 10 minutes to adjust the settings, so I have to be careful.

Picture 20


Basic Line drawing that I will be using for some sketches, It Is easier for me to trace it like this because and sketch it on it because It saves me time sketching out the outline every single time ha.

My next steps are to continue sketching, complete my canvases and to continue with my essay.


Tagged , , , , , , , , , , , , , , , , , , , , , , , , , , , , , , ,

Further Sketches

I am finding this whole illustration project very hard, I just no matter what can sketch, everything I coming out looking awful and I am losing interest on every design that I am doing at the moment and this is annoying because I really was looking forward to this project, I will continue and complete it, but at this rate I will not be happy with he final outcome.

Scan0021

A basic gorilla face outline.

Scan0022

After having a look at the illustrations by Si Scott I wanted to try something similar but I lost interest really quickly.

Scan0023

Did this all in a larger mark pen, came out alright but no where near how I want my illustrations on my canvas to look.

Scan0024

A rough sketch using a fine pen only, isn’t that bad.

Scan0025

Just an outline that I have done to use as a template for further sketching.

Tagged , , , , , , , , , , , , , , , , , , , , , , , , , , , , , , ,

Woodstains Part 2

After doing some research into wood stains I began creating my canvas’s for my designs, I made them in such a way that I could easily recreate them if needed be.

IMG_0882

I began by first buy some plain untreated wood, these I brought from b and q, they are meant for shelf but hey, I liked the size and the finish so there perfect, In the days when I did art I used to use only wood for all of my canvas’s that’s why I wanted to for this project too, I really wanted to almost go back to my route, in the way I first started designing.

IMG_0883

I know from working in b and q that the ronseal wood stain is very wood, the coverage is fantastic and the finish is what I am after, I choose to use an exterior wood stain because of the fact it would give me extra durability.

IMG_0884

I knew that I would need more than 1 layer of the woodstain so below is a shot of the first layer on the piece of pine wood.

IMG_0885

A close up shot of the stain.

I was originally going to use wooden decorative battens to create a frame around the piece of wood, so I began cutting all of the wood to size ready to be stuck down on the finished piece of wood after 3 layers of stain.

IMG_0886

Just a side shot showing the style of the wood that I was going to use.

IMG_0887

IMG_0888

To get the wood to fit like a frame I had to cut the ends at angles to make them fit flush and together properly, but in the long run this was a lot harder than I thought it would be.

IMG_0889

IMG_0890

Some of the pieces fitted together very well but others really didn’t and this was frustrating because it would take a lot of work to get them to fit correctly.

IMG_0891

When gluing the pieces down I had to use masking tape just to keep them down flush because they kept flexing out of shape from the piece of wood which wasn’t 100% straight to start with.

IMG_0898

When I began on the second canvas, 1st layer of the stain, had to do it inside because it was raining.

IMG_0899

Another shot of the angles on the wood battens.

IMG_0900

Tagged , , , , , , , , , , , , , , , , , , , , , , , , , , , , , , ,